I have already got a good idea of how I want the user interface for my script to work so I have been able to build this using python scripting. The functionality of the tool is non existent but you can get a better understanding of how it might be interacted with.
I had some trouble getting the layout I wanted initially. The ‘columnLayout’, ‘gridLayout’ and ‘rowLayout’ options weren’t working out for me and using tabs or drop down frames wasn’t what I wanted either. To get a move on with the interface I used a ‘formLayout’, although it took slightly longer to code it was easier to get the result I wanted.
The interface itself is pretty close to the sketch I did earlier and I think overall should be easy to understand by any user familiar with Maya.
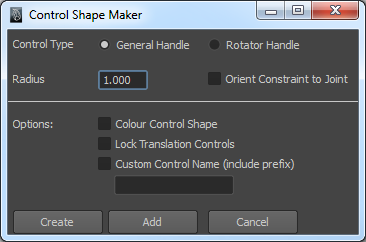
In the first section of the layout the user can select the type of control shape they want to make, by default it is a ‘General Handle’ which in this case is a NURBS circle. A ‘Rotator Handle’ can also be chosen which I described in my last scripting tool progress blog post.
For both shape types their radius can be chosen in the text input box and I’ve also included a check box here if you want to setup an orient constraint connecting the shape and joint. I initially had this feature locked to the rotator handle only but quickly decided it would necessary to orient constrain shapes other than the rotator type.
A separator separates the shape type options with the additional options. This currently includes the ability to colour the control shape. Right now I plan to have the colour automatically selected and applied depending on where the joint is: blue on the left side, red on the right side and yellow for central shapes. As a more advanced feature I could allow the user to select the colour themselves through a colour selection UI but for now I’m happy with the automatic as it will be useful in my own rigs.
Locking translation controls is also useful especially for joints with an orient constraint so this will simply lock and hide the translation attributes from the control shape.
In addition I’ve included the option to override the automatic name given to the control shape. The script to create control shapes which we used earlier in the semester automatically names the control shape after the joint. My thought behind the custom name was where when I used this script in the past I sometimes wanted a different name for the shape. Example: a control shape assigned to jnt_head_2 might want to be called ctrl_head_top.
I think the userface’s design resembles that of what most Maya windows look like. I’ve also contained both the ‘Create’ and ‘Add’ buttons at the bottom (many maya windows have this) where they both apply the create operation but ‘add’ keeps the window open so you can perform multiple uses of the tool.
My next step is to simply implement the creation of control shapes into the buttons, then work down the list of features on the window adding in the relevant functionality.